Arduino with Firebase
Dec, 2015
我們可以很方便的使用html去寫入或讀取Firebase中的資料
主要是因為ESP8266還有許多難題需要克服
以下的網路連接方式為有線的
(無線可參考Ameba with Firebase via Wi-Fi)
要讓Arduino與Firebase連接,以下方法為最容易達到的
但缺點是程式碼與編譯方式必須採用johnny five和node.js
接下來會分三段介紹
一、架設使用環境
二、上傳按鈕狀態至firebase
三、下載firebase資料至LCD螢幕
註:此步驟在這裡不需要做,只是先知道而已
編譯方式建議先在路徑(C:\User\user\)內創個文件檔,例:hello.js
開啟Node.js command prompt,輸入 node hello.js
即可執行此檔案
中斷指令為 ctrl + C 連按兩次

輸入 npm install -g node-gyp
輸入 npm install johnny-five
輸入 npm install firebase
上傳成功至板子後即可關閉Arduino IDE
var Firebase = require("firebase");
var board = new five.Board();
//使用你自己的網址
var myFirebaseRef = new Firebase("https://arduinoclock.firebaseio.com/");
board.on("ready", function() {
console.log("Ready!");
var button = new five.Button(2);
button.on("hold", function() {
console.log( "Button held" );
myFirebaseRef.child("button").set("held");
});
button.on("press", function() {
console.log( "Button pressed" );
myFirebaseRef.child("button").set("pressed");
});
button.on("release", function() {
console.log( "Button released" );
myFirebaseRef.child("button").set("released");
});
});
使用Node.js command prompt輸入node hello.js
點擊按鈕,可以看到Firebase中的button有資料變化
var Firebase = require("firebase");
board = new five.Board();
var myFirebaseRef = new Firebase("https://arduinoclock.firebaseio.com/");
board.on("ready", function () {
//這邊controller宣告方式要依照使用的方式進行修改(見官網)
var lcd = new five.LCD({
controller: "PCF8574"
});
lcd.clear();
lcd.cursor(0,0).print("start");
console.log("start");
//要讀的key為LCD
myFirebaseRef.child("LCD").on("value", function(snap) {
var data = snap.val();
lcd.clear()
lcd.cursor(1,0).print(data);
});
});
在Firebase中要建立資料,key的名稱為LCD
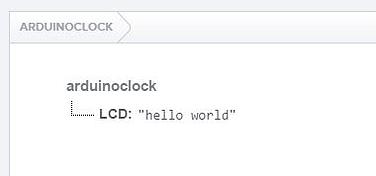
使用Node.js command prompt輸入node hello.js
更改Firebase中LCD的value,可以看到Arduino中的LCD會顯示出來
主要是因為ESP8266還有許多難題需要克服
以下的網路連接方式為有線的
(無線可參考Ameba with Firebase via Wi-Fi)
要讓Arduino與Firebase連接,以下方法為最容易達到的
但缺點是程式碼與編譯方式必須採用johnny five和node.js
接下來會分三段介紹
一、架設使用環境
二、上傳按鈕狀態至firebase
三、下載firebase資料至LCD螢幕
一、架設使用環境
我們要使用的平台為node.js
並且include johnny five與Firebase
第一步:安裝node.js
至官方網站下載註:此步驟在這裡不需要做,只是先知道而已
編譯方式建議先在路徑(C:\User\user\)內創個文件檔,例:hello.js
開啟Node.js command prompt,輸入 node hello.js
即可執行此檔案
中斷指令為 ctrl + C 連按兩次
第二步:include johnny five與Firebase
開啟Node.js command prompt輸入 npm install -g node-gyp
輸入 npm install johnny-five
輸入 npm install firebase
第三步:使用Arduino IDE上傳檔案至板子
找到Examples > Firmata > StandardFirmata上傳成功至板子後即可關閉Arduino IDE
二、上傳按鈕狀態至Firebase
大家可以參考別的文章關於申請Firebase,這裡假設每個人都以有屬於自己的空間網址
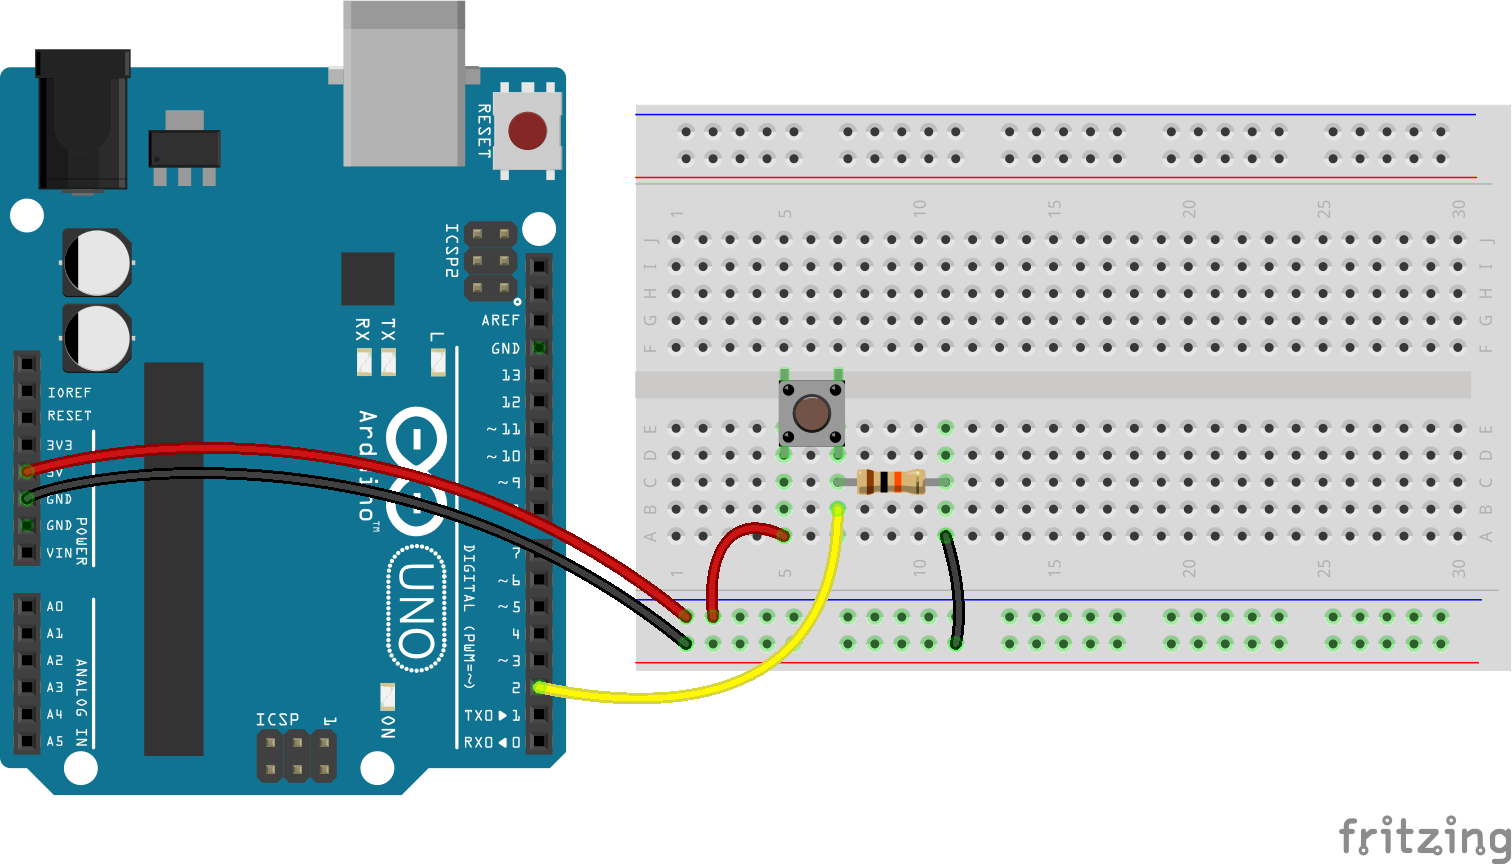
硬體接法如官網中的例子
建立js擋,以下為程式碼(例:hello.js中)
var five = require("johnny-five");var Firebase = require("firebase");
var board = new five.Board();
//使用你自己的網址
var myFirebaseRef = new Firebase("https://arduinoclock.firebaseio.com/");
board.on("ready", function() {
console.log("Ready!");
var button = new five.Button(2);
button.on("hold", function() {
console.log( "Button held" );
myFirebaseRef.child("button").set("held");
});
button.on("press", function() {
console.log( "Button pressed" );
myFirebaseRef.child("button").set("pressed");
});
button.on("release", function() {
console.log( "Button released" );
myFirebaseRef.child("button").set("released");
});
});
使用Node.js command prompt輸入node hello.js
點擊按鈕,可以看到Firebase中的button有資料變化
三、下載Firebase資料至LCD螢幕
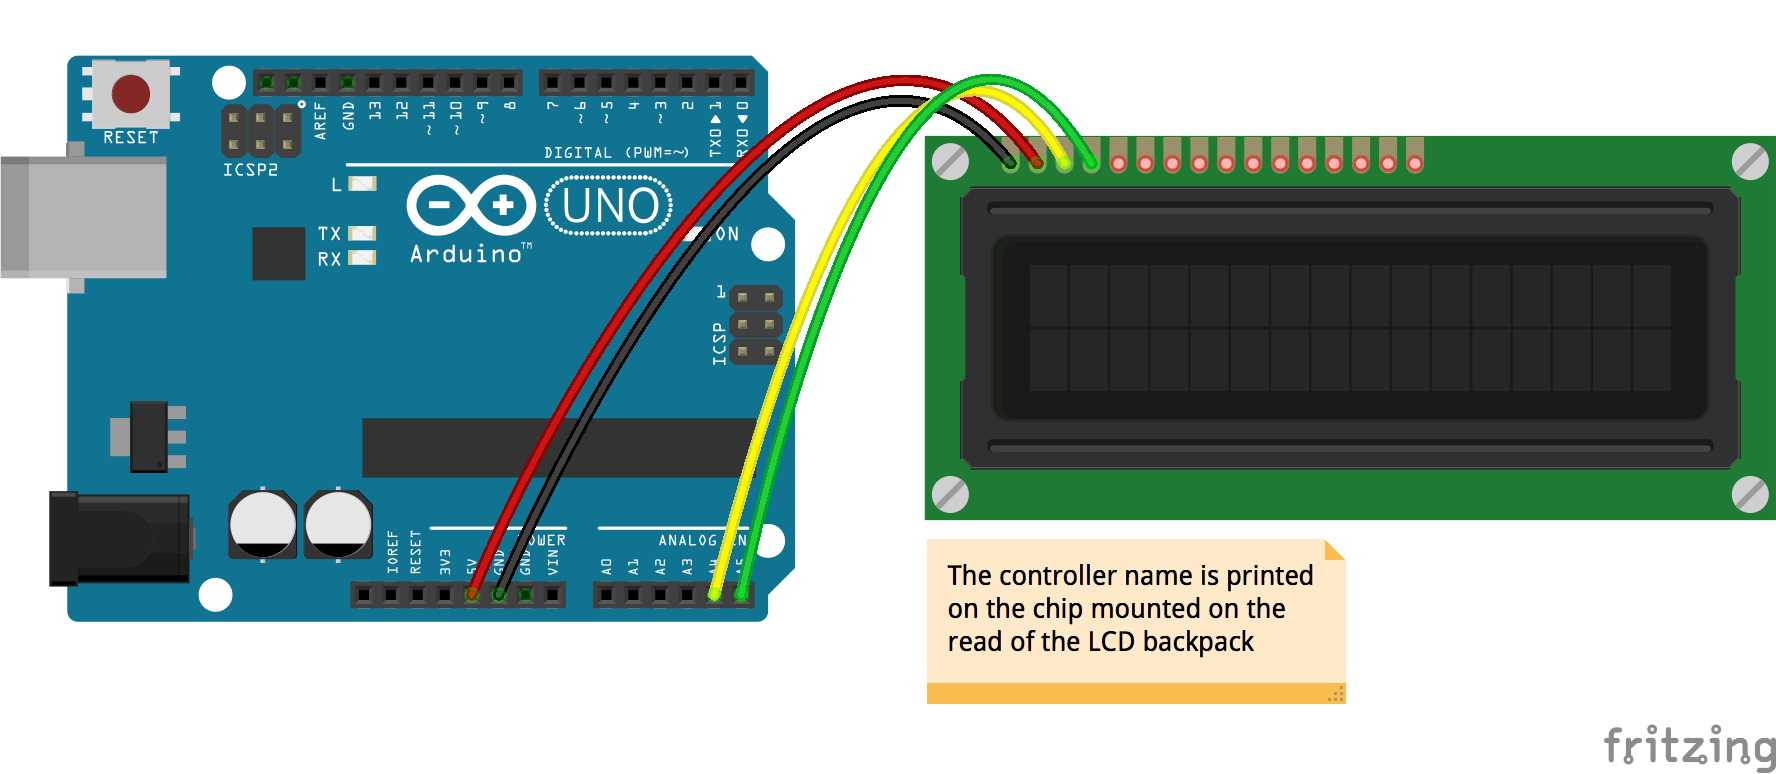
我是使用LCD1602與轉板PCF8574
硬體接法如官網中的例子
建立js擋,以下為程式碼(例:hello.js中)
var five = require("johnny-five");var Firebase = require("firebase");
board = new five.Board();
var myFirebaseRef = new Firebase("https://arduinoclock.firebaseio.com/");
board.on("ready", function () {
//這邊controller宣告方式要依照使用的方式進行修改(見官網)
var lcd = new five.LCD({
controller: "PCF8574"
});
lcd.clear();
lcd.cursor(0,0).print("start");
console.log("start");
//要讀的key為LCD
myFirebaseRef.child("LCD").on("value", function(snap) {
var data = snap.val();
lcd.clear()
lcd.cursor(1,0).print(data);
});
});
在Firebase中要建立資料,key的名稱為LCD
使用Node.js command prompt輸入node hello.js
更改Firebase中LCD的value,可以看到Arduino中的LCD會顯示出來